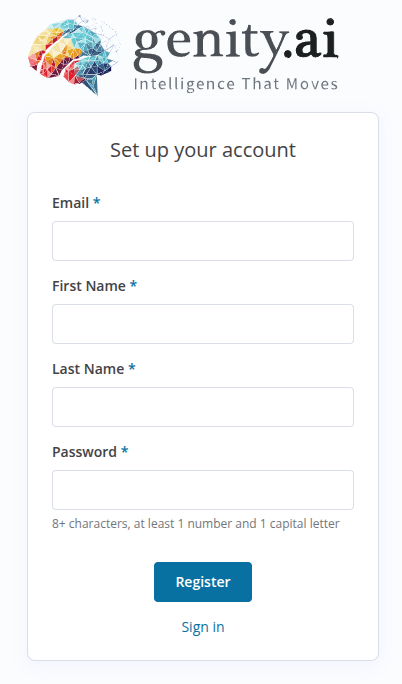
Set Up Your Genity.ai Account
To begin using Genity.ai, you must first register for an account.
Step 1: Access the Registration Page
- Visit the official Genity.ai website.
- Navigate to the Sign Up or Register section.
Step 2: Enter Your Details
You will be presented with a registration form requiring the following information:
- Email
- Enter a valid and active email address. This will be used for login and official communications.
- First Name
- Last Name
- Password
- Create a strong password
- Minimum of 8 characters
- Includes at least one lowercase letter
- Includes at least one number
- Includes at least one special character (e.g., @, #, $, !)
- Example: Secure@2025
Step 3: Submitting Your Information
- After filling in all required fields, click the Register button.
- If all inputs are valid, you will receive a confirmation message or be redirected to your dashboard.
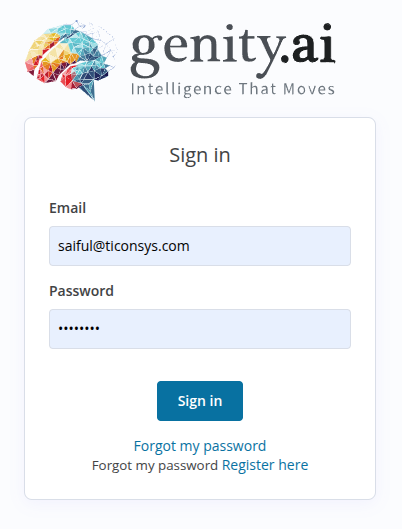
Signing In to Your Genity.ai Account
After registering and verifying your Genity.ai account, you can access the platform by signing in with your credentials. This section of the user manual will guide you through the login process.
1. Access the Login Page
- Visit the official Genity.ai website.
- Click on the Sign In button.
2. Enter Your Credentials
You will be prompted to provide your login details:
- Email
- Enter the email address you used during registration
- Password
- Enter the password associated with your Genity.ai account.
3. Sign In to Your Account
- After entering your credentials, click the Sign In button.
- If your login information is correct, you will be redirected to your Genity.ai dashboard.
Overview Page
The Overview Page in Genity.ai serves as your command center for managing automation workflows, associated credentials, and their execution history. It is designed for ease of use, helping users create, locate, and control automation processes effectively.
At the top of the Overview page, you'll find three primary tabs:
- Workflows
- The main workspace for managing individual automation workflows.
- Lists all workflows available to you.
- Credentials
- Manage saved authentication data such as API keys, usernames, and passwords for external services.
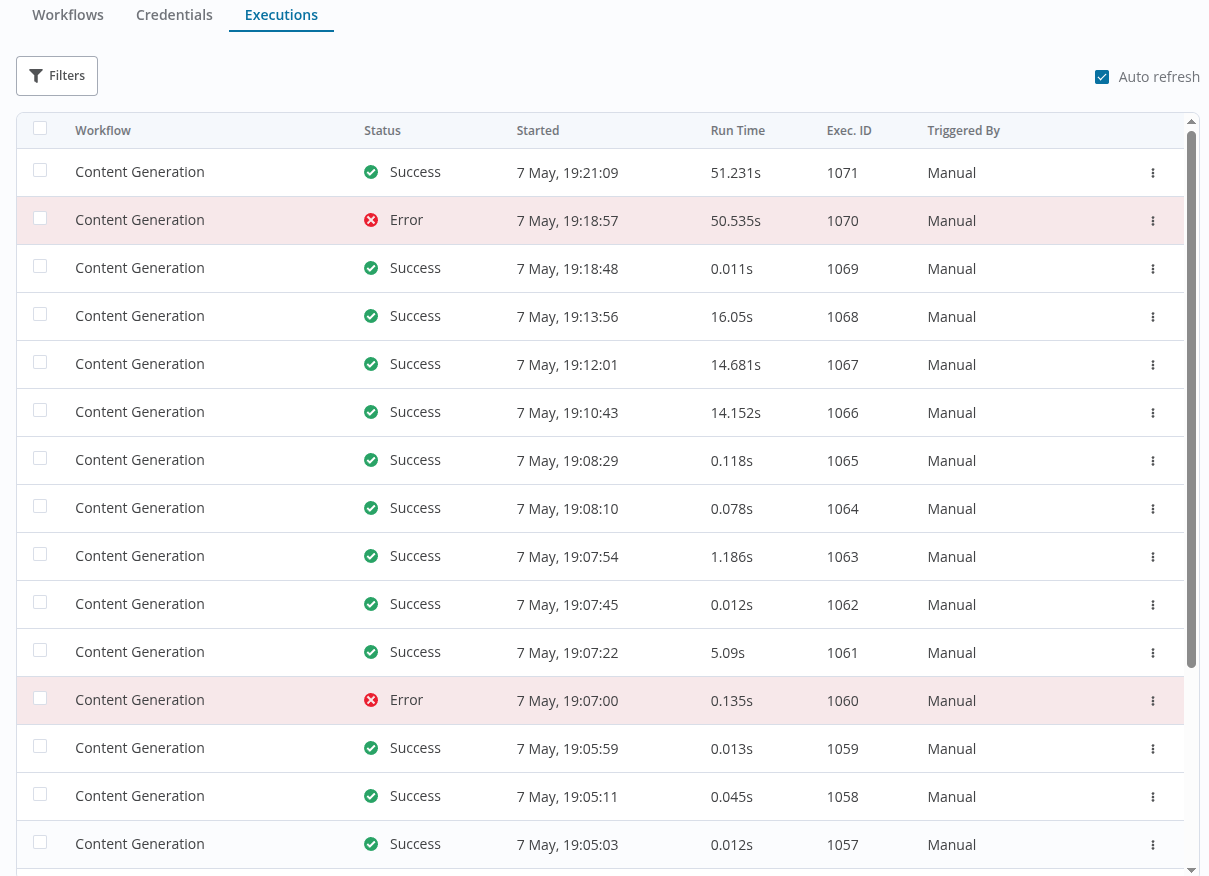
- Executions
- View historical runs of your workflows, including statuses (success/failure) and execution logs
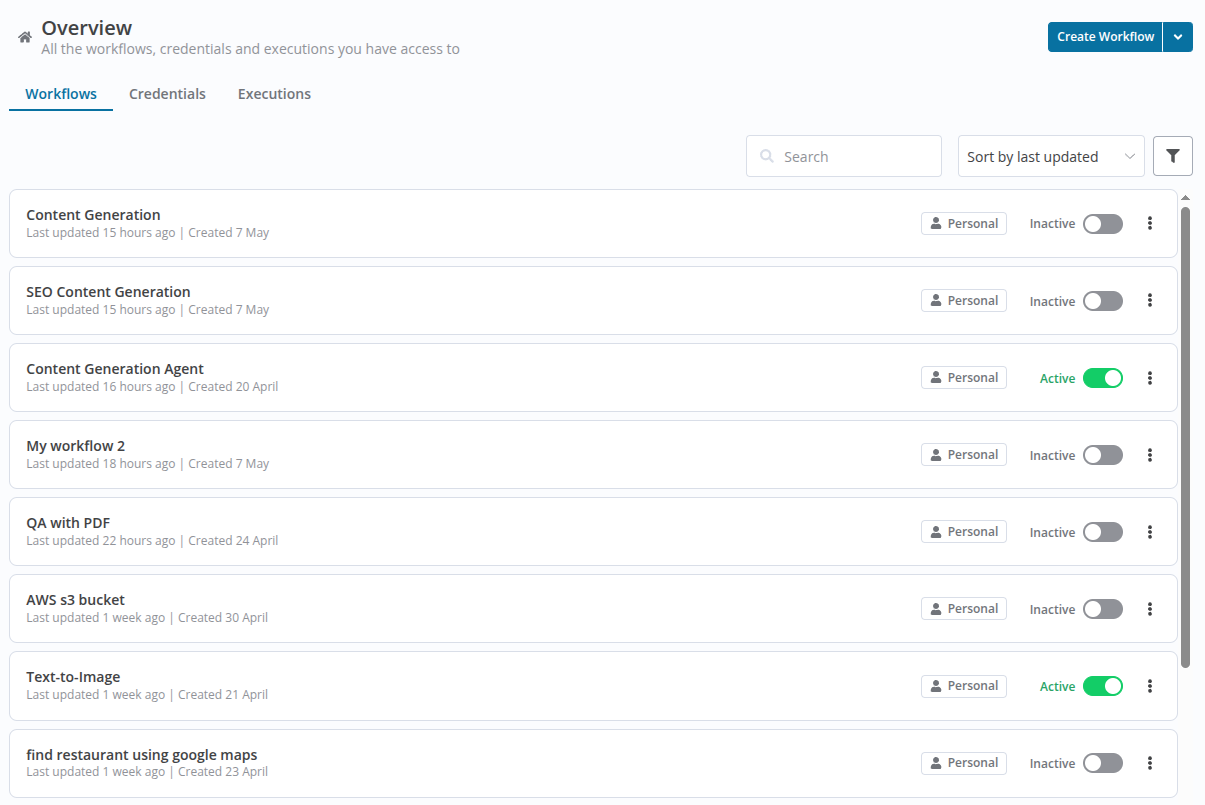

The Workflows Tab
When the "Workflows" tab is selected, it provides a robust interface to manage your automation processes efficiently.
- Create Workflow Button
- Click this button to start building a new workflow. A dropdown may offer choices like: Create from Scratch
- Search Bar
- Search for a specific workflow by typing its name or relevant keywords. Helps in quickly locating large numbers of workflows.
- Sort Options
- Sort workflows using various criteria such as: Activate or Deactivated
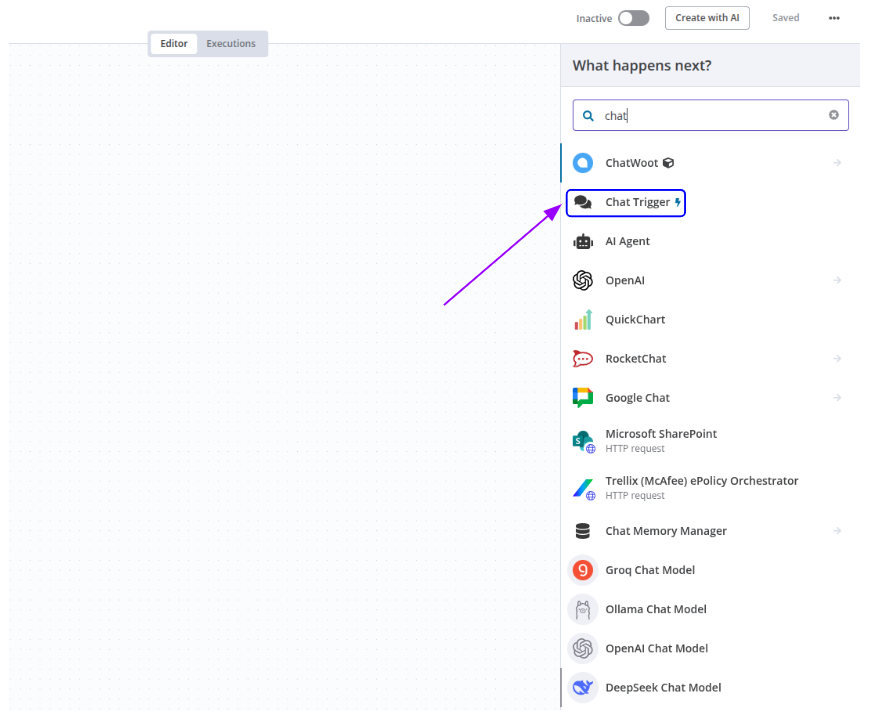
Import Node for Design Workflow
Search Bar
- Directly beneath the panel header
- Quickly find a specific node by typing relevant keywords
- Typing "chat" filters the list to chat-related nodes
- Use the ⓧ icon on the right side of the bar to reset your search and return to the full list
List of Available Nodes / Steps
- Icon: Represents the node or service visually (e.g., OpenAI, email, HTTP).
- Node Name: The main label, such as "Chat Trigger" or "OpenAI."
- Optional Description: Some nodes show brief additional context (e.g., "Send HTTP request").
- Sub-options Arrow (→):
- Appears at the right of some nodes like "Google Drive" or "Upload File."
- Clicking them may open a submenu or lead to further configuration options.
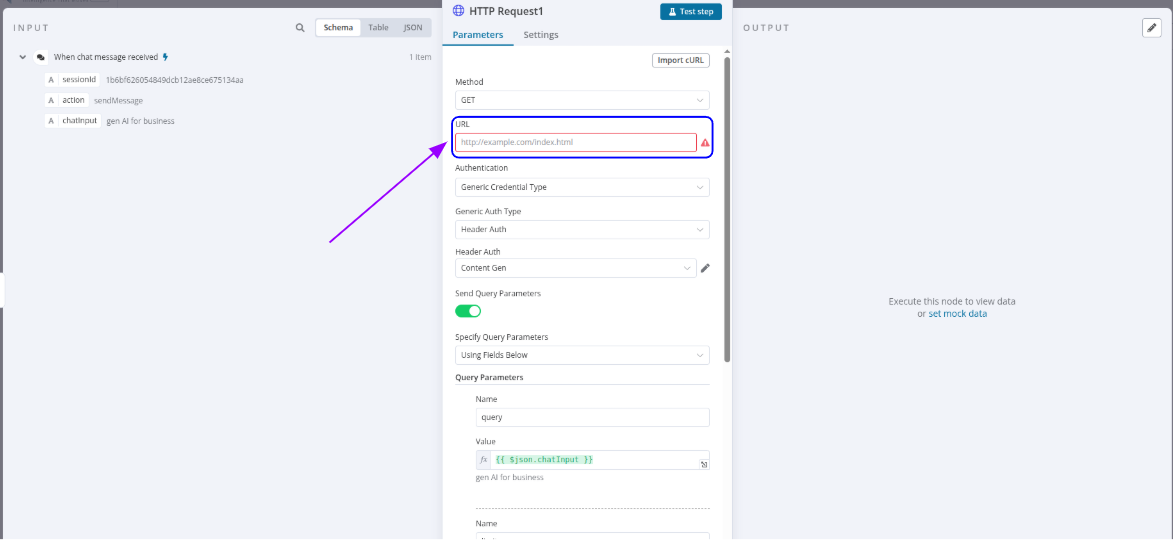
Configuring the HTTP Request Node
The HTTP Request node allows your workflow to communicate with web services and APIs---fetching data, triggering events, or sending information to other systems. It's one of the most flexible and powerful tools available in the workflow editor.
When selected, the node opens a configuration panel, which is typically divided into three areas:
1. INPUT Panel (Left Side)
- Displays incoming data from previous nodes in the workflow, which you can reference dynamically in your HTTP request.
- View input data as Schema, Table, or JSON.
- Reference this data in fields using expressions like {{ $json.chatInput }}.
2. Node Configuration Area (Center Panel - "HTTP Request")
- Default is "HTTP Request1" (can be renamed).
- Parameters: Main configuration settings (URL, method, headers, body, etc.).
Test Step Button
- Located at the top of the node panel.
- Allows you to test this node independently to preview the server's response.
Import cURL Button
- Located in the top-right of the Parameters tab.
- Paste a cURL command here to auto-populate request fields.
Key Fields in the Parameters Tab:
- Method
- Type of HTTP request.
- Options: GET, POST, PUT, DELETE, PATCH, etc.
- URL (Required):
- The endpoint you want to request.
- ⚠️ Warning Icon: Appears when the URL is invalid, inaccessible, or a placeholder.
- Authentication (Optional):
- Required if the endpoint is secured.
- Generic Credential Type
- Basic Auth / Bearer Token / API Key
- Header Auth
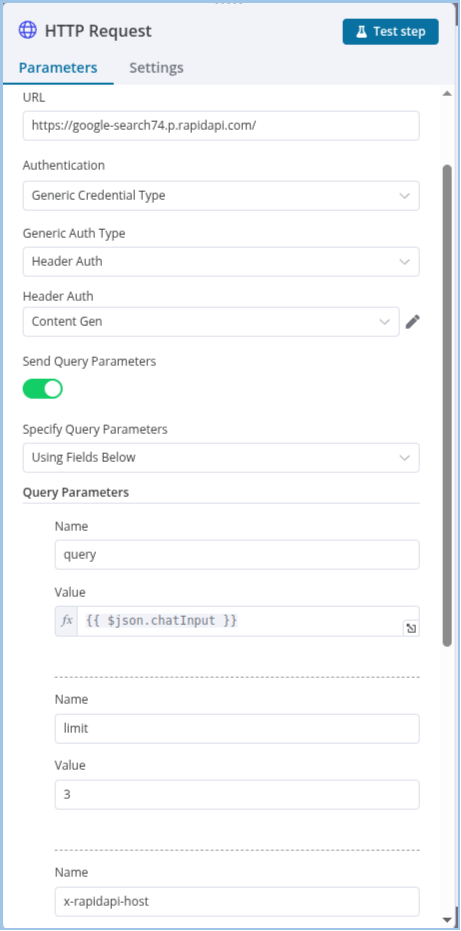
- Specify Query Parameters (Dropdown):
- Using Fields Below
- From JSON
- Query Parameters (List):
- Add key-value pairs:
- Name: query
- Value: {{ $json.chatInput }} → Dynamically uses data from the trigger.
3. OUTPUT Panel (Right Side)
Displays the server response after the HTTP request is made.
Contents After Execution:
- Status Code: e.g., 200 OK, 404 Not Found
- Headers: Response headers
- Body: Main content (e.g., JSON data)
How to Find and Use APIs from a Marketplace (e.g., RapidAPI)
Integrating APIs into your workflow allows you to connect with external services. Marketplaces like RapidAPI offer a centralized way to discover, test, and use thousands of APIs. This guide walks you through the full process---from signing up to configuring your HTTP Request node with API credentials and endpoint data.
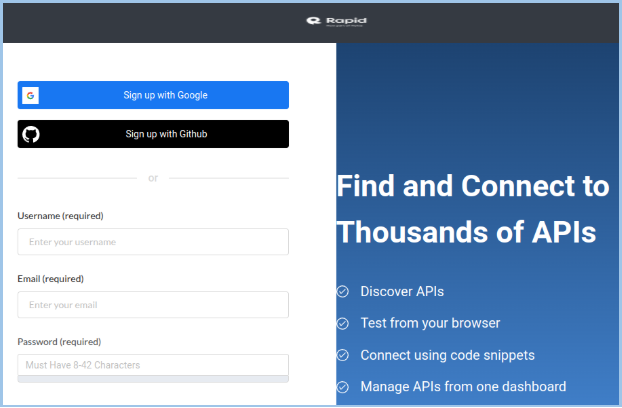
Step 4: Sign Up or Log In to the API Marketplace
Access the Marketplace
Create an Account
- Click Sign Up.
- Choose one of the following options:
- Google or GitHub for quick sign-up.
- Or fill in the form with:
- Username (required)
- Email (required)
- Password (must meet security criteria, e.g., 8--42 characters)
✅ Note: If you already have an account, click Log In.
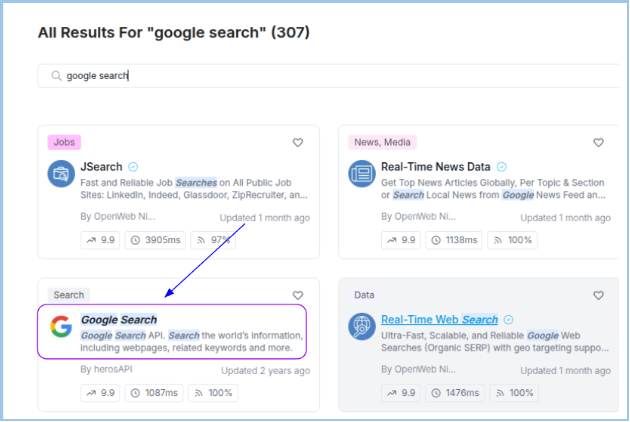
Step 5: Search for an API
Locate the Search Bar
- Once logged in, find the search input field at the top of the dashboard.
Enter Keywords
- Type a relevant keyword related to your use case.
- Example: google search
Browse the Results
- You will see results like:
- API Name
- Description
- Provider info
- Tags
- Performance stats (latency, success rate)
Select the Desired API
- Example: Google Search API by herosAPI
- Features: Provides web pages, related keywords, and more.
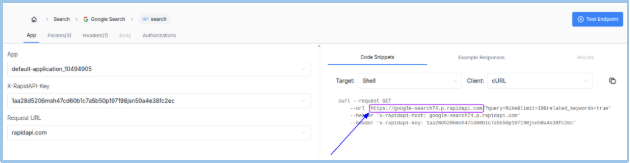
Step 6: Explore API Documentation & Get Your API Key
Access the API's Documentation
- After selecting an API, you'll land on its documentation page.
- Look for tabs like:
- Endpoints
- Pricing
- Code Snippets
🧭 The breadcrumb trail shows your navigation (e.g., Home > Search > Google Search > GET search).
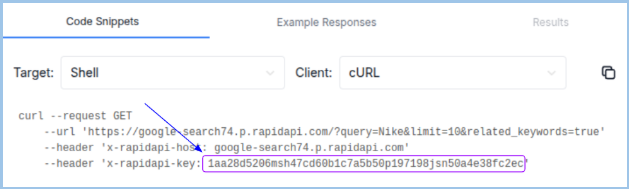
Find Your API Key
- Look in the left-side panel or under Code Snippets.
- Typical Headers include:
- x-rapidapi-host: google-search74.p.rapidapi.com
- x-rapidapi-key: 1aa28d5206msh4….
Use the information from the documentation and code snippet to set up an HTTP request in your workflow tool (e.g., genity).
Steps to Connect OpenAI
- Get Your API Key:
- Log into OpenAI Platform
- Navigate to the API Keys section and generate a new secret key.
- Copy and securely store the key.
- Enter Your API Key:
- Paste it into the API Key field in the configuration screen.
- Enter Organization ID (Optional):
- Only needed if using multiple organizations with OpenAI.
- Verify the Base URL:
- Confirm it's set to https://api.openai.com/v1 unless using a custom endpoint.
- Test the Connection:
- Click Test Connection or Save & Test (depending on the UI).
- Look for the green message: "✓ Connection tested successfully"
- Close the Dialog:
- Once verified, close the window. Your OpenAI connection is now active.

Part 1: Configuring and Using an OpenAI Agent Node
Once an OpenAI agent node (like Data Extractor Agent or Summarizer Agent) is added to your workflow, here's how to configure it effectively:
Node Title
- You can rename the node (e.g., "Summarizer Agent") by clicking the ✏️ pencil icon near the title.
- Clear naming helps identify node functionality.
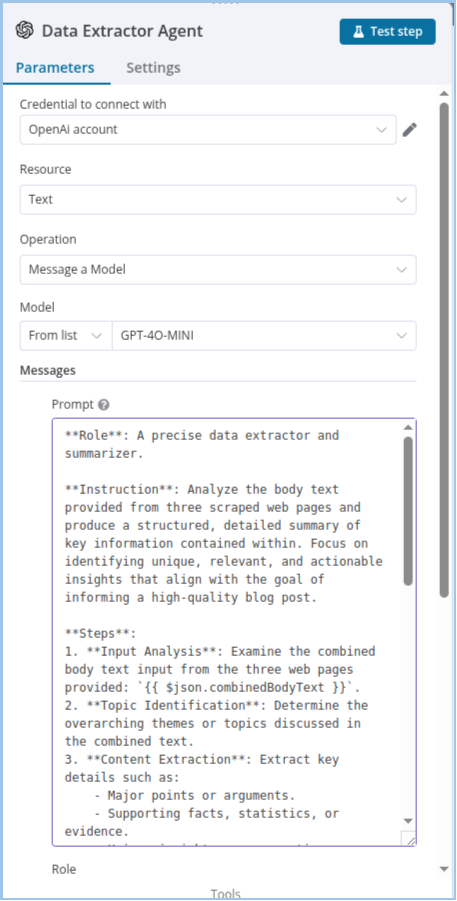
Parameters Tab
This is where you define how the AI agent behaves.
Credential to Connect
- Select your pre-configured OpenAI account from the dropdown list.
- Use the ✏️ icon to edit or add a new credential if needed.
- Choose the OpenAI resource type — often "Text" for language models.
- Most commonly used: "Message a Model" — for sending prompts and receiving AI-generated replies.
- Select a model like GPT-4O-MINI from the dropdown list.
- Choose "From list" to pick from available models under your OpenAI account.
Use a structured approach for better results:
- Role: (e.g., "You are a skilled data extractor").
- Instruction: Detailed tasks and constraints (e.g., "Extract company names and revenue figures").
- Steps: (Optional) Add numbered steps for clarity.
Define who is "speaking" in the prompt:
- user — for user instructions
- system — for setting behavior
- assistant — for AI replies
Part 2: Testing and Checking Output of an AI Agent Node
Before running your entire workflow, it's crucial to validate each AI node independently.
Using "Test Step"
- After configuring the node, click "Test step" in the top-right of the panel.
- This runs only the selected node using available input data from prior steps.
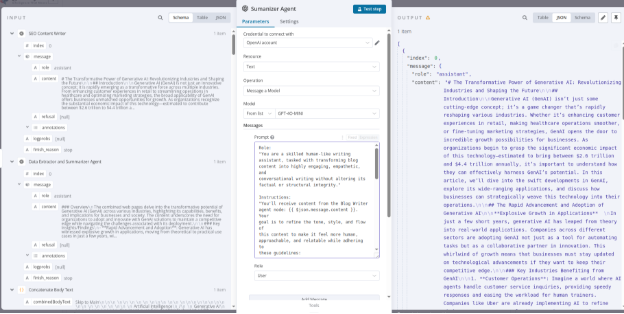
The right-side OUTPUT panel will display the AI's response.
- JSON: Raw, structured output (most detailed).
- Table: For structured, list-like data.
- Schema: Shows the data format and types.
- role: Usually "assistant"
- content: The actual response text
- Other fields: finish_reason, logprobs (technical metadata)
Part 3: Running the Entire Workflow
Once all nodes (especially AI agents) are configured and tested, you're ready to launch the workflow.
Check Node Connections
- Ensure arrows indicate proper data flow between nodes
- Verify that any trigger node (e.g., "Users input ⚡️") is properly set
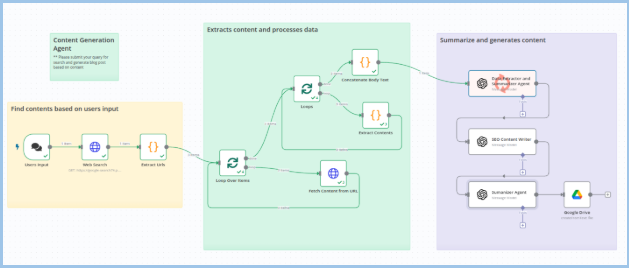
Workflow begins automatically when the trigger fires (e.g., new input, webhook, file upload).
Click the "Run Workflow" or ▶️ Play button in the UI toolbar to begin the process manually.
Inspect the last node's output:
- This could be an AI agent's summary
- Or a storage action (e.g., saving a document to Google Drive)
Activating and Deactivating Your Workflow
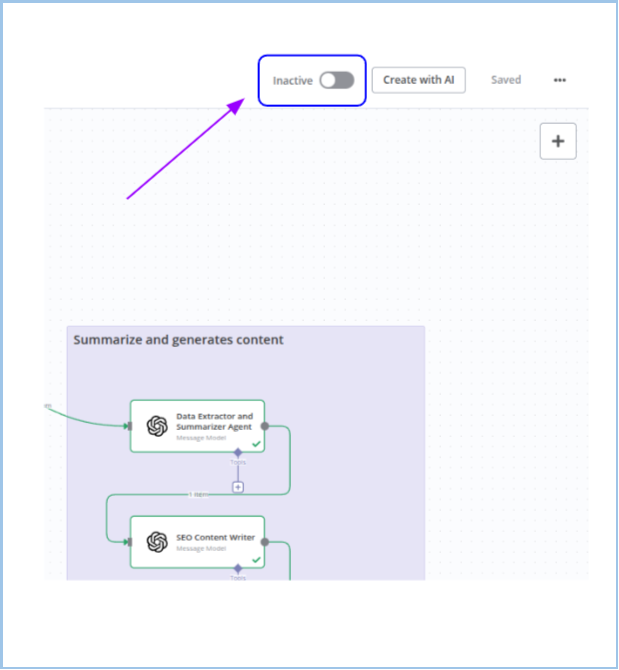
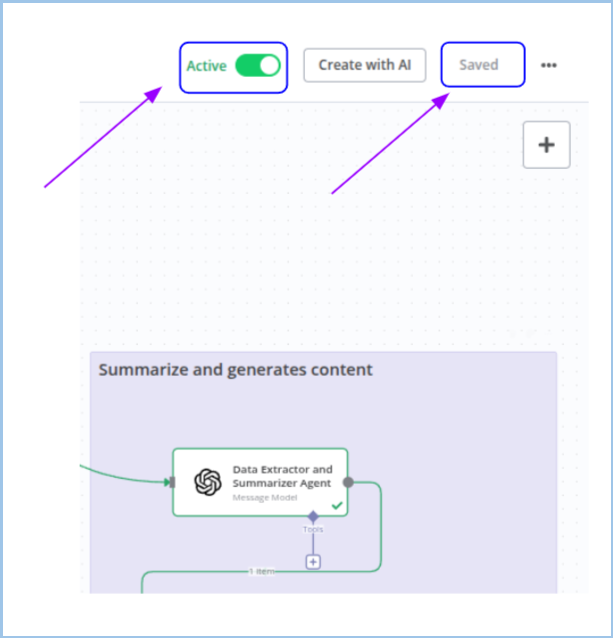
In many automation platforms, workflows (sometimes called "projects") can be toggled between Active and Inactive states. This determines whether your workflow is live and executable.
Where to Find the Toggle
- The activation toggle is located at the top of the workflow editor, typically near controls like "Save," "Create with AI," and a three-dot menu (...).
- In your interface, purple arrows in the UI images point directly to this toggle switch.
Understanding Workflow States
1. Inactive State
- Visual Cue:
- Toggle is on the left side, labeled "Inactive" in grey or a muted tone.
- What It Means:
- The workflow won't execute automatically (even if trigger conditions are met).
- You can't manually run the workflow.
- Ideal when you're:
- Still building or editing the workflow.
- Want to pause a workflow temporarily.
- Keeping it as a backup or template.
- Saving Changes:
- Even while inactive, any edits are usually auto-saved, or a "Saved" status confirms manual saves.
2. Active State
- Visual Cue:
- Toggle is on the right side, labeled "Active" with a green or more prominent color.
- What It Means:
- The workflow is live and executable.
- It can automatically trigger based on conditions (e.g., webhook, schedule).
- You can manually trigger the run as well (if designed for manual input).
- Best Use:
- When the workflow is fully configured, tested, and ready to deliver automation tasks.
How to Toggle the Workflow Status
To Activate a Workflow:
- Open the workflow in the editor.
- If the toggle is grey and says "Inactive", click it.
- It will shift to the right, turning green and updating to "Active."
To Deactivate a Workflow:
- Open the workflow in the editor.
- If the toggle is green and says "Active", click it.
- It will shift to the left, turning grey and updating to "Inactive."
Additional Tips & Controls
- Saved Status:
- After toggling, watch for a "Saved" indicator or save manually if required.
- Create with AI Button:
- Near the toggle, this button helps generate nodes or prompts using AI—not related to the workflow's status.
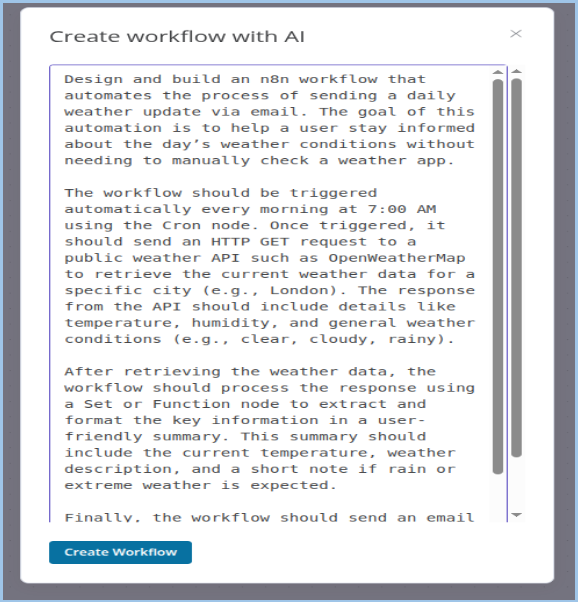
Create Workflows with AI in genity
Step 7: Access the Feature
Click "Create with AI" in the workflow editor or when starting a new workflow.
Step 8: Describe Your Workflow
Enter a clear prompt including:
- Goal (e.g., send daily weather updates)
- Trigger (e.g., daily at 7 AM via Cron)
- Services (e.g., OpenWeatherMap API)
- Data Handling (e.g., extract and format weather info)
- Output (e.g., email summary)
Step 9: Generate Workflow
Click "Create Workflow" and wait for AI to build the flow.
Step 10: Configure Each Node
- Cron: Set the schedule
- HTTP Request: Add full API URL and key
- Format Node: Write logic to extract/format data
- Send Email: Add credentials, recipients, subject, and body
Step 11: Test Workflow
Test each node, fix any ⚠️ warnings, then activate the workflow.